PrePoMax first tutorials – summary
Hi, there are now 3 videos available on my youtube channel where I show how to do simple analyses in the free and easy to use PrePoMax.
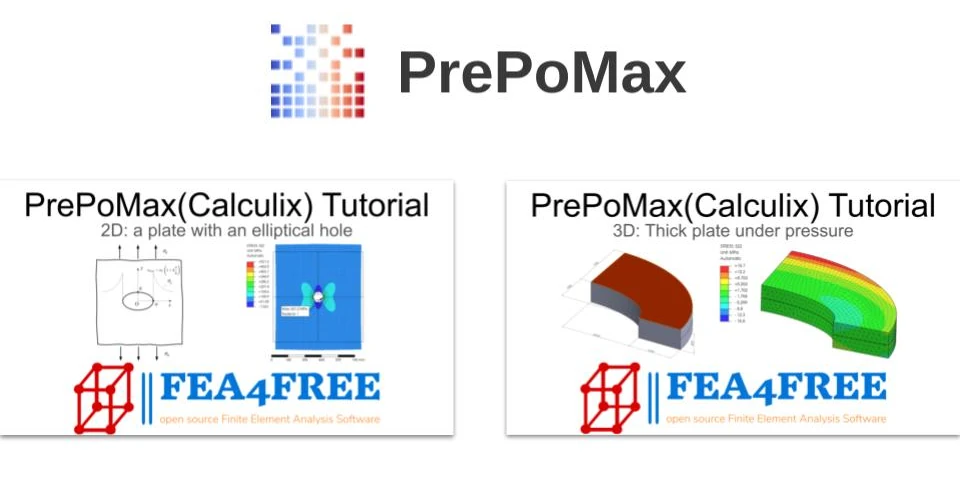
2D Example – Plate with elliptical hole
The first video is a 2D analysis. The geometry is prepared in the Sharper module of the Salome-Meca software (made in previous tutorials) and exported in .iges format. When starting PrePoMax, the analysis type is selected, then the saved geometry is imported. On the ruler you can see that the model size is wrong so we scale the model accordingly.
To get a nice mesh, I had to go through a few trials. I was surprised that PrePoMax in this case did (by default) a worse mesh than Salome-Meca, because they use the same subprogram for making meshes (NetGen). However, with other analyses, it was PrePoMax that did a better meshs than Salome.
Creating a material, assigning it and adding boundary conditions is very intuitive and simple. The solution to this simple case is quick and the result as correct.
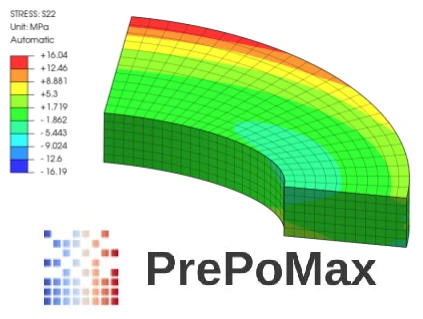
3D Example – Thick Plate Under Pressure
Similarly as for the 2D geometry, here too we use Salome and the .iges format to export the geometry. PrePoMax imported the geometries as two separate parts. In order for a common wall to have a common mesh we need to couple them, for which there is a simple function in the software. It is important to scale the model first and then couple the parts to avoid problems. We obtain a pleasing tetrahedral mesh. The analysis settings are trivial, the result correct again.
3D Example – Hexahedral mesh
Same model and load case as before. PrePoMax does not have a mesher that creates a hexahedral mesh (plus for Salome-Meca). However, you can import a previously created mesh in another program (e.g. opensource Salome or GMSH). In this tutorial, I use the Salome programme. We load the mesh prepared during the tutorial for Salome-Meca and export it in .unv format. This is the format that PrePoMax supports. If we import the mesh, the programme takes us to the FE Model tab, where we set the material, analysis type and boundary conditions. Before this, we still need to remove additional mesh layers (surfaces) that were created during the export from Salome. The recognition of surfaces and edges in the imported mesh works very well in PrePoMax (such an option is missing in Ansys APDL!), making it easy to assign boundary conditions. The calculations are very fast, the result correct.
Summary
Doing these analyses has confirmed to me that PrePoMax is brilliant in its simplicity, it has all the most necessary functions needed for analyses to begin with. I also know that the programme is developing and I am very happy about this. The result of the analyses are fine and so is the time duration. Solver Calculix is also a trusted and good tool in open-source analysis and with PrePoMax it now has a great Pre/Postprocessor. Together they make a super duo.
News on the blog
In the meantime, while the new PrePoMax tutorials were coming out, I was working on the look of this site. The current theme is, in my opinion, nicer and looks more modern than the previous one. It now has more modification options, which I really like. Each article now has a table of contents so that you can navigate easily.
A new category “news” has been added to the menu, in which I will be posting short articles about news in the world of open source MES (e.g. a new release of the software ).
Future
A large article on analysis with shell elements in open-source programs is planned for the near future. There are opinions on the internet that free programs are not suitable for these analyses and I – like a myth-buster – want to check this out for myself. I think there will be three tutorials on how to do an analysis with shell elements (two in Salome-Meca and one in PrePoMax). And the conclusion of the series will be a big article where, I will compare the results in these two programs, I will also add the results from the paid program and I will do a summary of the results depending on the size and order of mesh . I am very curious how these results will come out and I am looking forward to writing this series.
Now I would like to write, sign up for the FEA4free newsletter so you don’t miss the news. Unfortunately there is no newsletter yet But this is the next technical thing I would like to introduce on the blog. I have an idea that people who are members of the newsletter to have access to the files of the analyses I do in the tutorials. Write what you think about it and see you in future articles, tutorials and videos.